
Join us to learn about how to build CI/CD pipeline using Gitlab for Salesforce. Learn how to get started quickly with CI/CD using GitLab and Salesforce DX tools. In this post we will talk about step by step process to setup setup CI/CD pipeline for Salesforce.
What is CI/CD pipeline?
CI/CD falls under DevOps and it combines the practices of continuous integration and continuous delivery. With a CI/CD pipeline, We can then automatically test and pushed out for delivery and deployment. This best practice helps development teams to detect problems, identify bugs, and fix those problems and bugs before releasing changes to their customers.
What is Continuous Integration (CI)?
Using continuous integration, a product is made to incorporate and integrate each code modification on each commit (continuously), by any and all developers. an automated build then verifies each check-in, letting teams detect issues early.
What is Continuous Delivery (CD)?
Continuous delivery ensures that code will be speedily and safely deployed to production by manually pushing each change to a production-like environment. Since each modification is automatically delivered to a staging environment, you’ll be able to deploy the application to production with a push of a button once the time is correct.
What is Continuous Deployment(CD)?
Continuous deployment is the next step of continuous delivery. using Continuous deployment, each modification that passes the automated tests is deployed to production automatically. Most firms that aren’t bound by regulatory or other constraints should have a goal of continuous deployment.

Benefits of CI/CD implementation
- Shorter Development Cycles, Faster Innovation
- Reduced Deployment Failures, Rollbacks, and Time to Recover
- Improved Communication and Collaboration
- Increased Efficiencies

Build a CI/CD Pipeline for Salesforce
Let’s see a step-by-step process to set up CI/CD pipeline using GitLab for Salesforce. Before reading it check out 5 Pillars of a successful Salesforce DevOps process.
1. Create a Self-Signed SSL Certificate and Private Key
#1.1. Got OpenSSL?
You use the OpenSSL library to generate your security certificate.
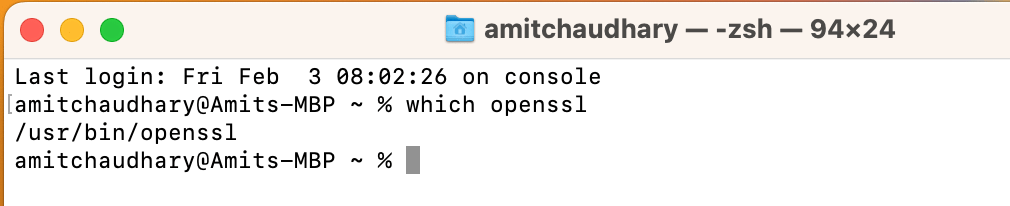
- Run the following command in your local environment to see whether you already have OpenSSL installed:
which opensslDid this command return a path that looked something like this?
- /usr/bin/openssl
- If the
which opensslcommand doesn’t return a path, install OpenSSL.
| If you have | Install with |
| macOS | Homebrew: brew install openssl |
| Windows | Windows complete package.exe installer |
1.1.2 Create Certificate
Using OpenSSL, issue a new private key and certificate, and store them in a file called server.key. To do this, enter the following commands.
Generate an RSA private key
openssl genrsa -des3 -passout pass:x -out server.pass.key 2048Create a key file from the server.pass.key file
openssl rsa -passin pass:x -in server.pass.key -out server.keyGenerate a certificate signing request using the server.key file. Store the certificate signing request in a file called server.csr. Enter information about your company when prompted
openssl req -new -key server.key -out server.csr| Prompt | Input |
| Country Name (2 letter code) | US |
| State or Province Name (full name) | GA |
| Locality Name (eg, city) | AL |
| Organization Name (eg, company) | ApexHours |
| Organizational Unit Name (eg, section) | Demo |
| Common Name (eg, fully qualified host name) | ApexHours |
| Email Address | Enter your email address |
| Password | Press Enter to indicate no password |
Next, create a self-signed digital certificate from the server.key and server.csr files. Store the certificate in a file called server.crt.
openssl x509 -req -sha256 -days 365 -in server.csr -signkey server.key -out server.crtEncrypt the server.key file and add the encrypted file (server.key.enc) to an assets folder
openssl aes-256-cbc -salt -e -in server.key -out server.key.enc -k Password012. Create a Connected App for JWT-Based Flow
Learn more about Salesforce OAuth 2.0 JWT Bearer flow. Please follow the below step to create a connected app:
- Setup-> App Manager -> New Connected App
- Provide all required detail
- Callback URL:-http://localhost:1717/OauthRedirect
- Use digital signatures To upload your server.crt file.
- Include “Perform requests at any time (refresh_token, offline_access)”
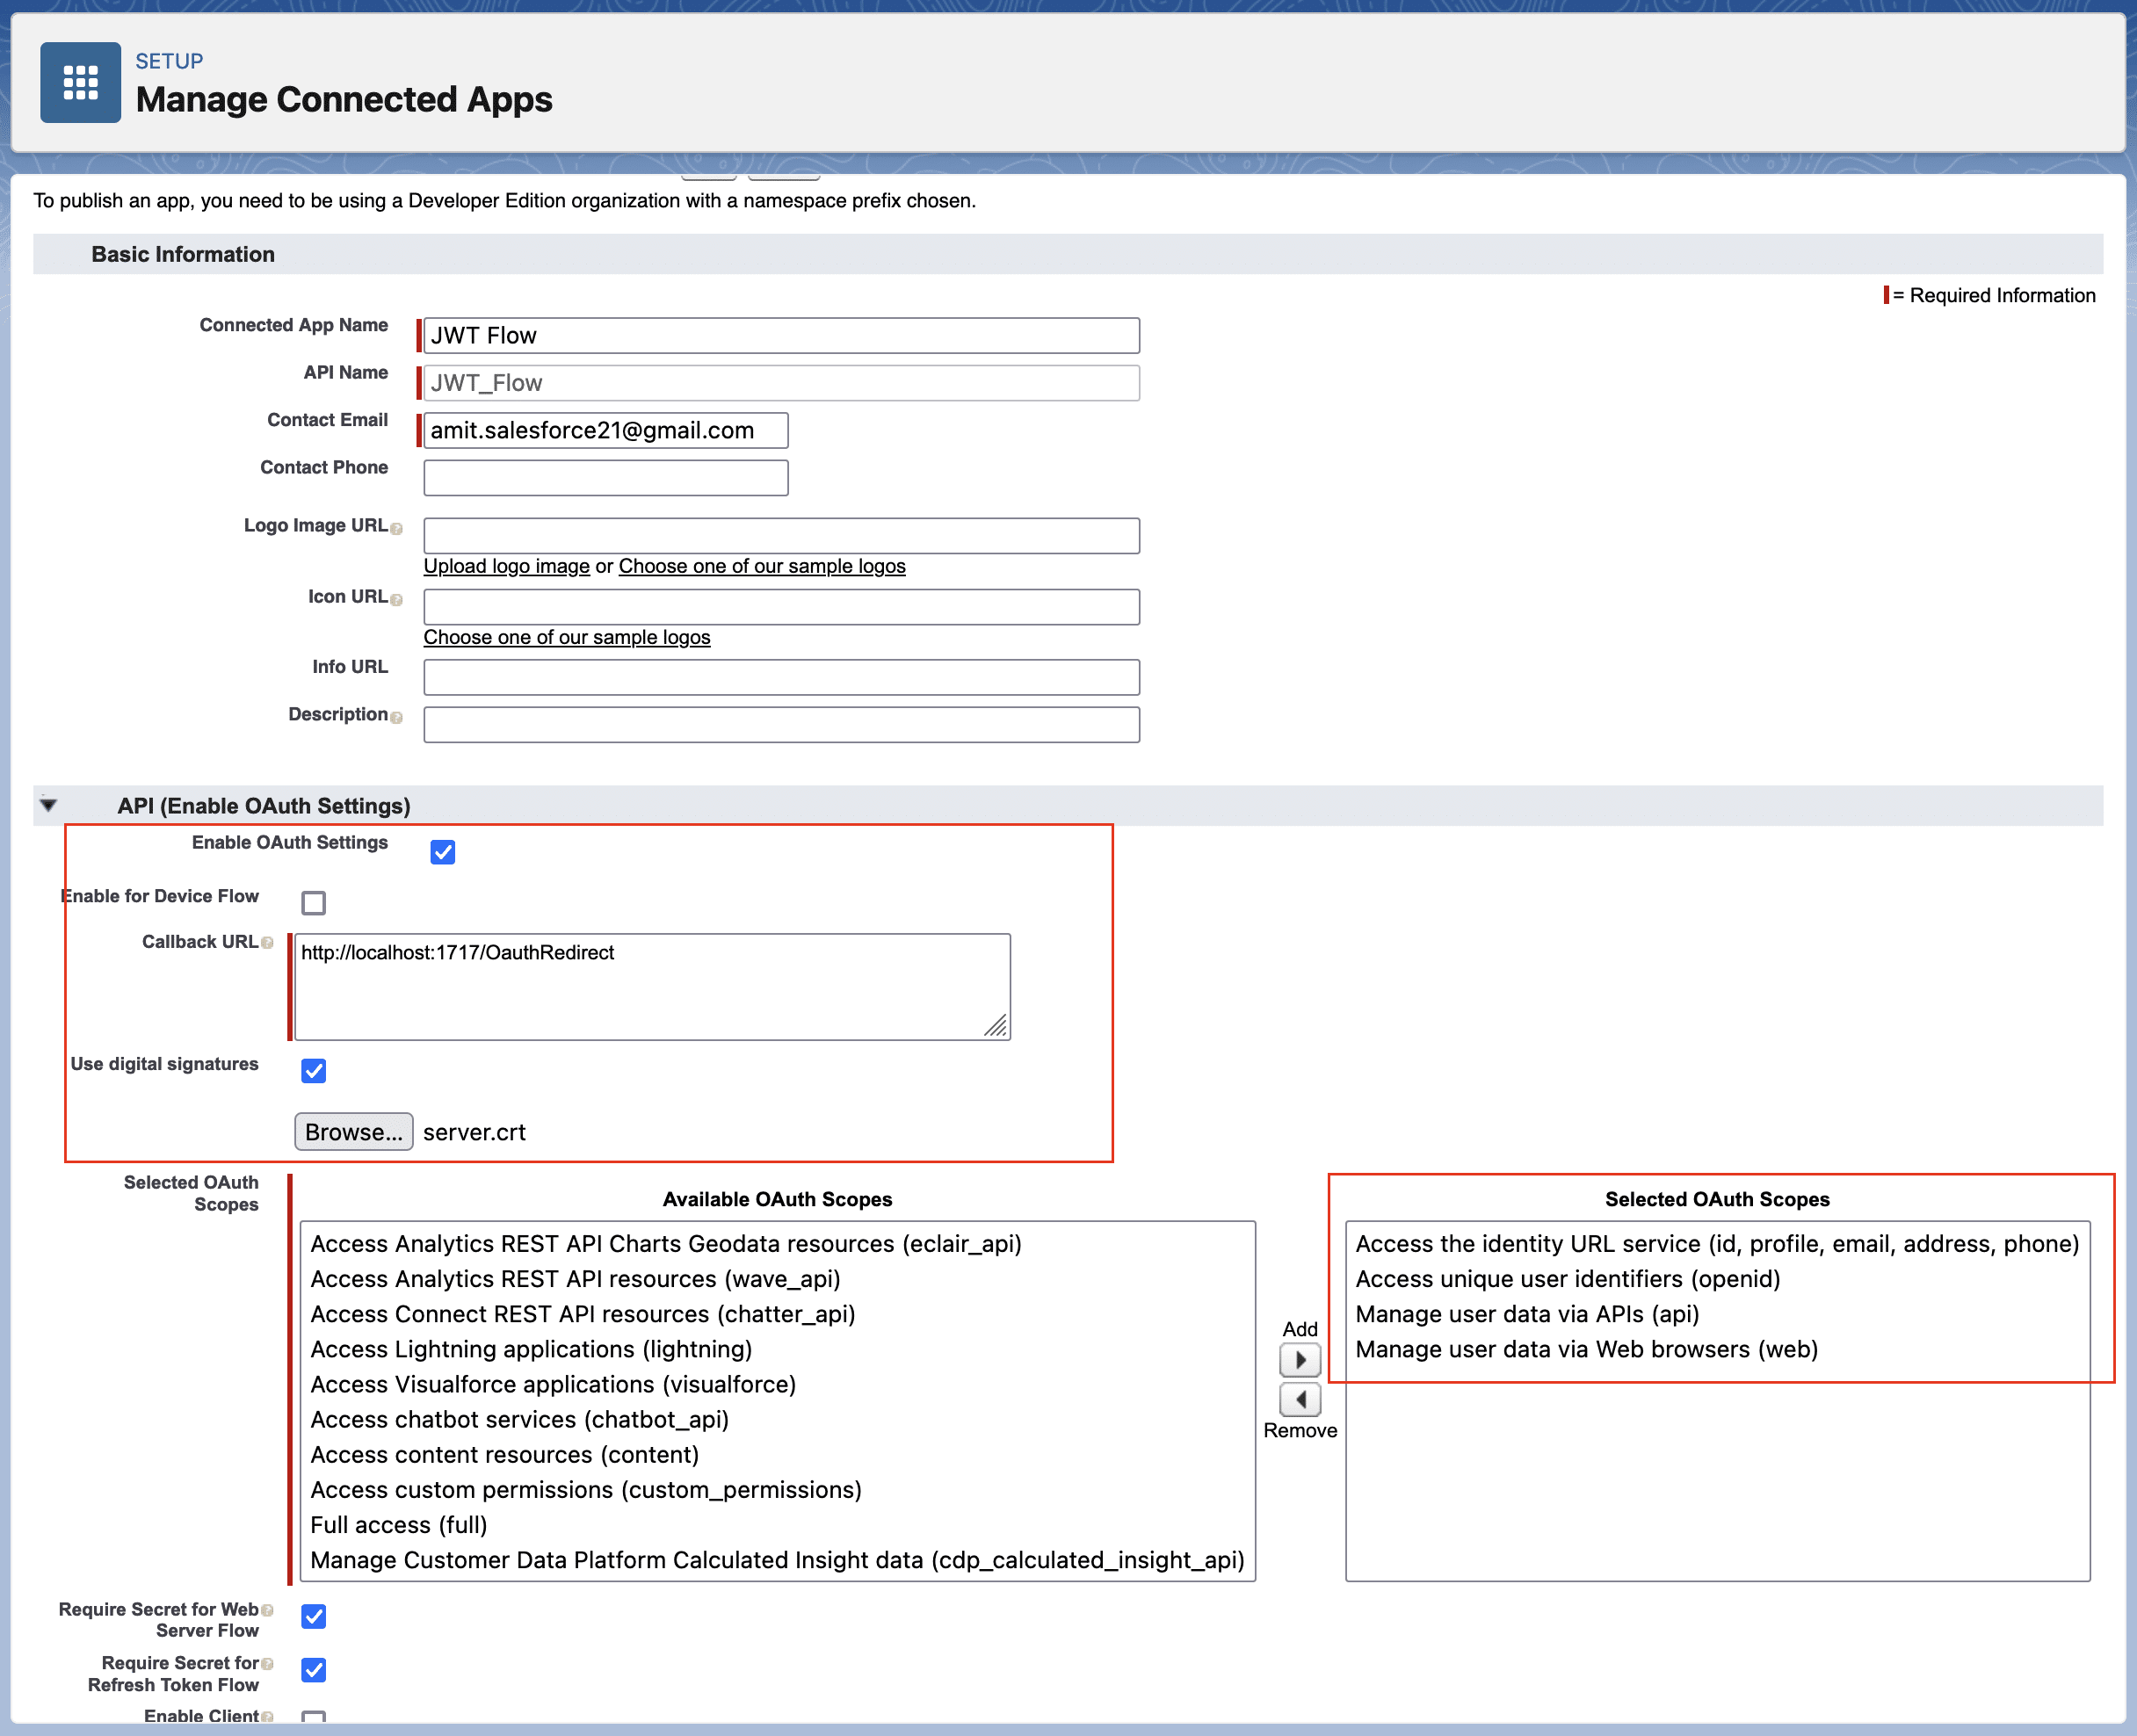
- Edit policy and select “Admin approved users are pre-authorized” to avoid “Not approved for access in salesforce” issue.
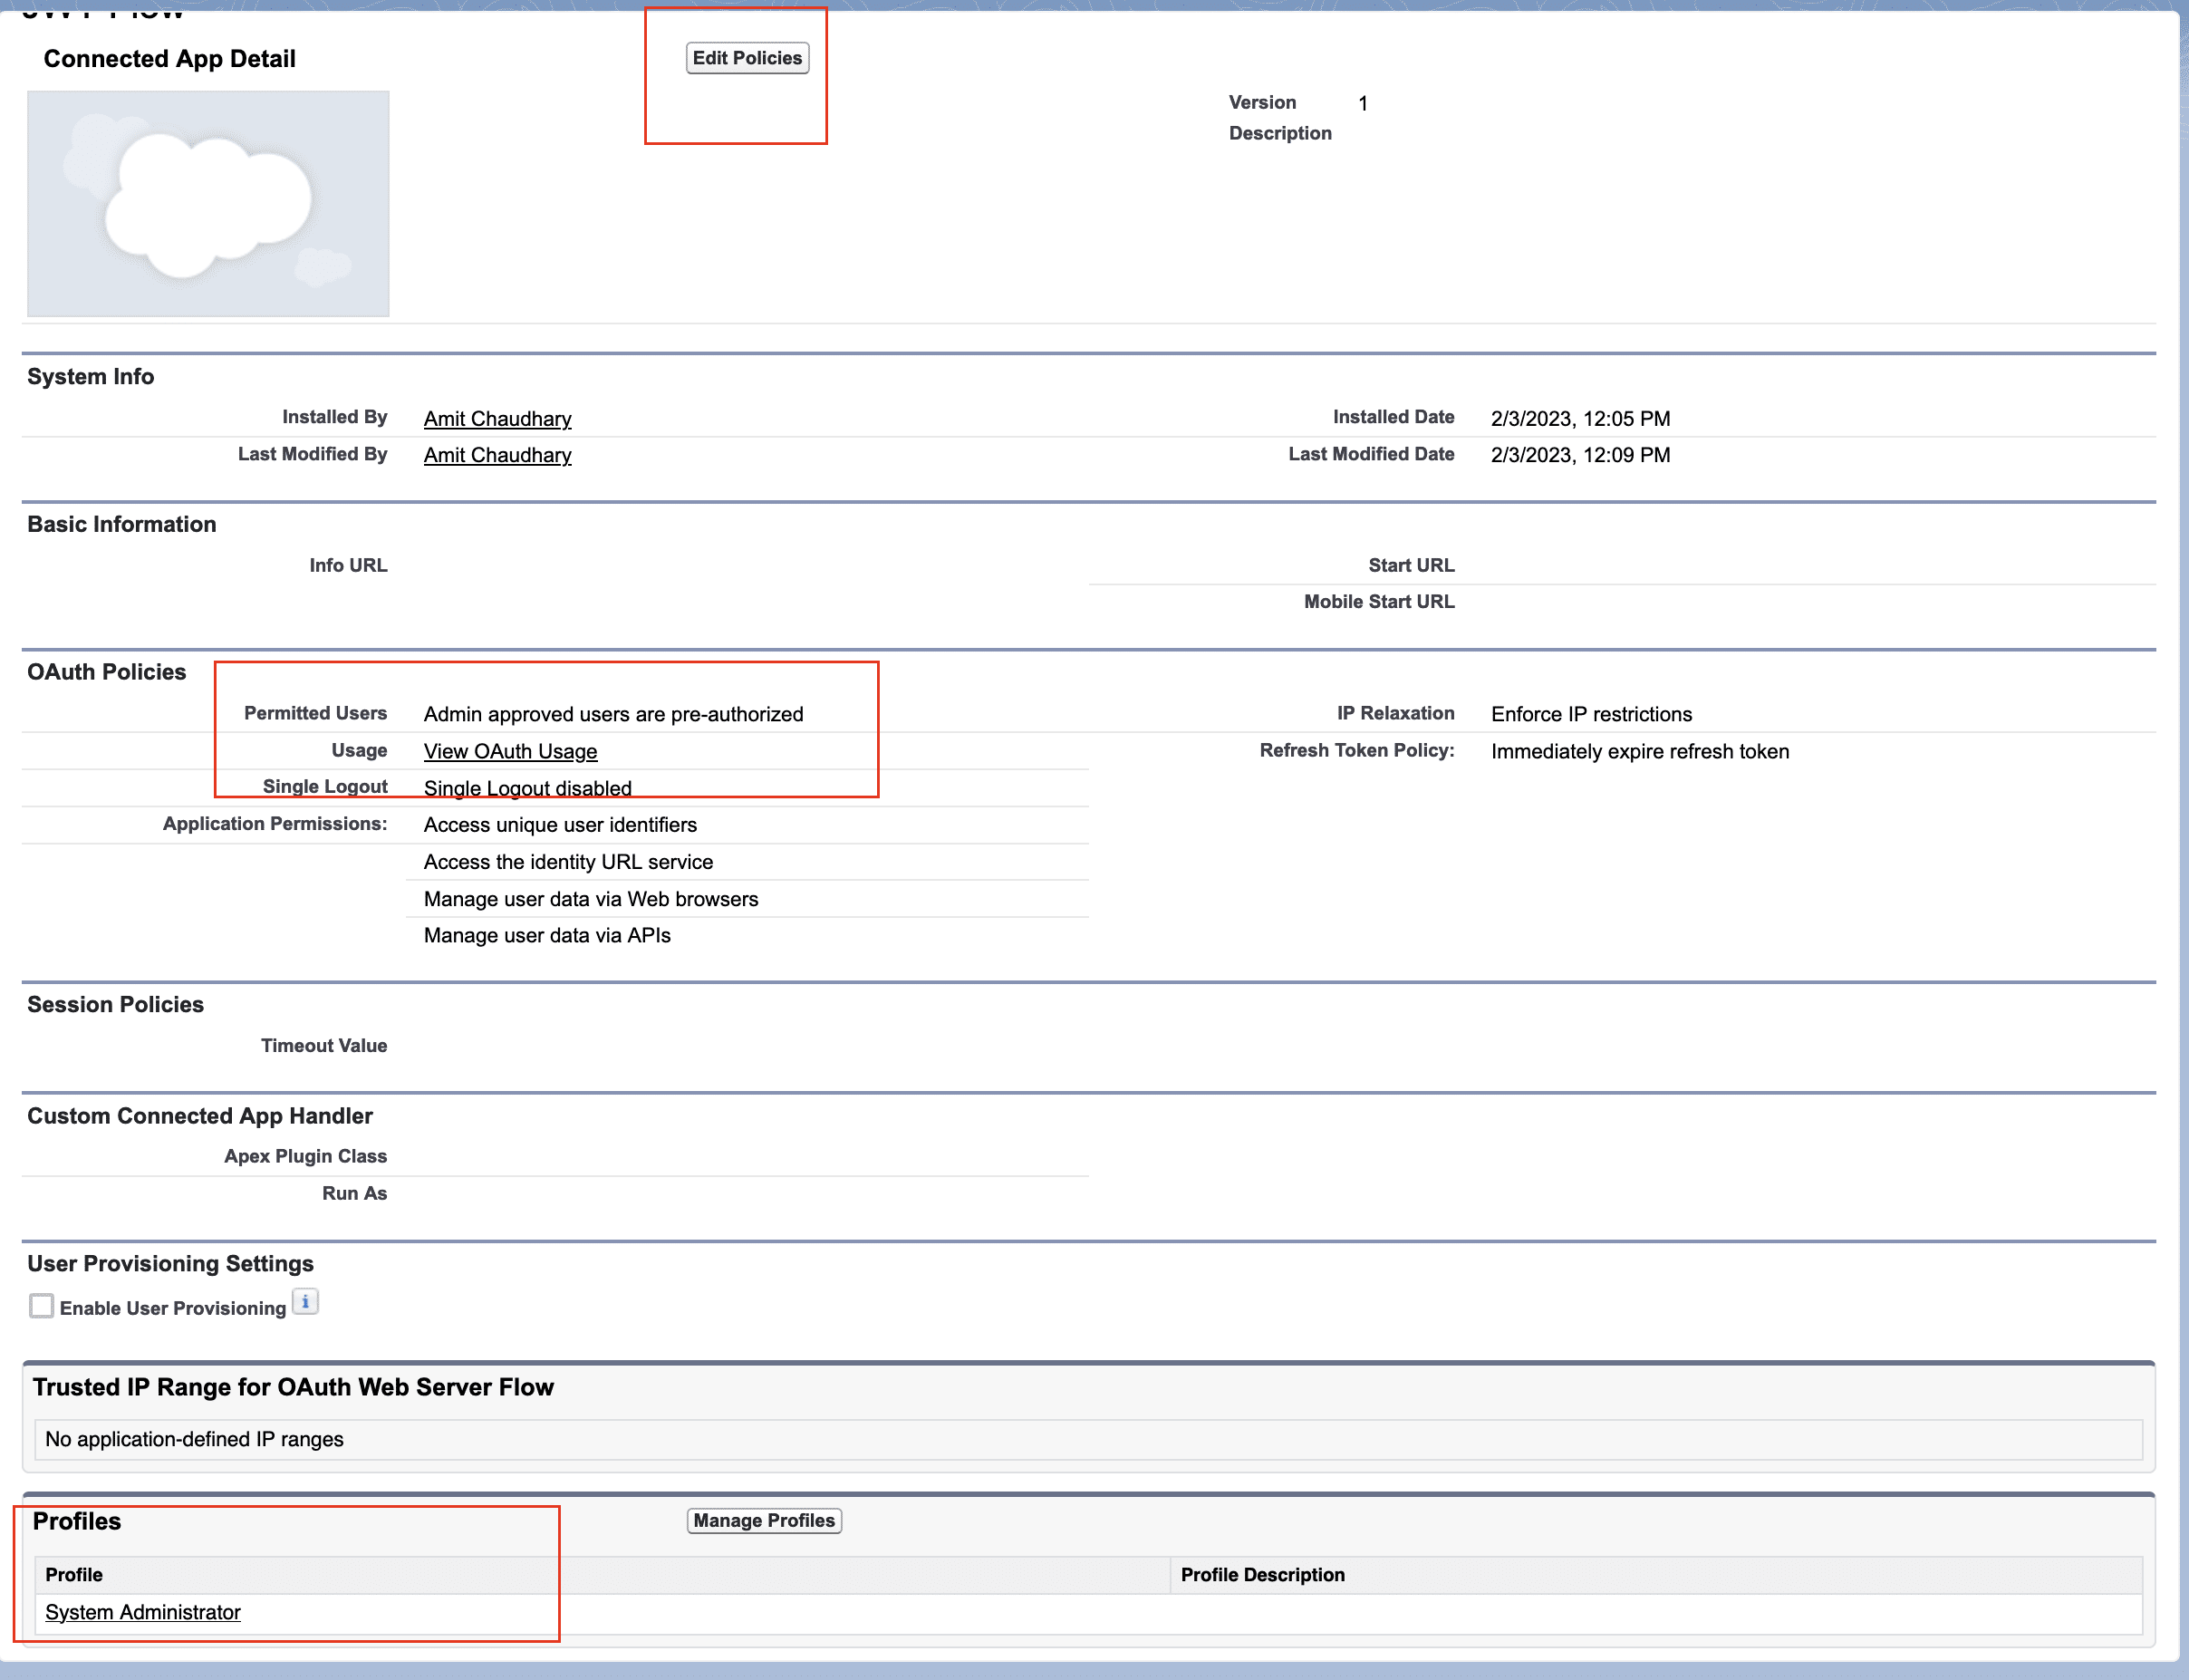
- Assign Connected App to user or System Admin profile.
- Validate Authorize an Org Using the JWT-Based Flow
sfdx force:auth:jwt:grant --clientid {ADD_YOUR_CLIENT_ID} --jwtkeyfile server.key --username [email protected] --instanceurl https://login.salesforce.com –setdefaultdevhubusername- –clientid :- provide Consumer Key
- –jwtkeyfile :- Absolute path to the location where you generated your OpenSSL server.key file
- –instanceurl :-provide instanceurl if you are using sandbox.
- –setdefaultdevhubusername :- Set Default dev hub User Name.

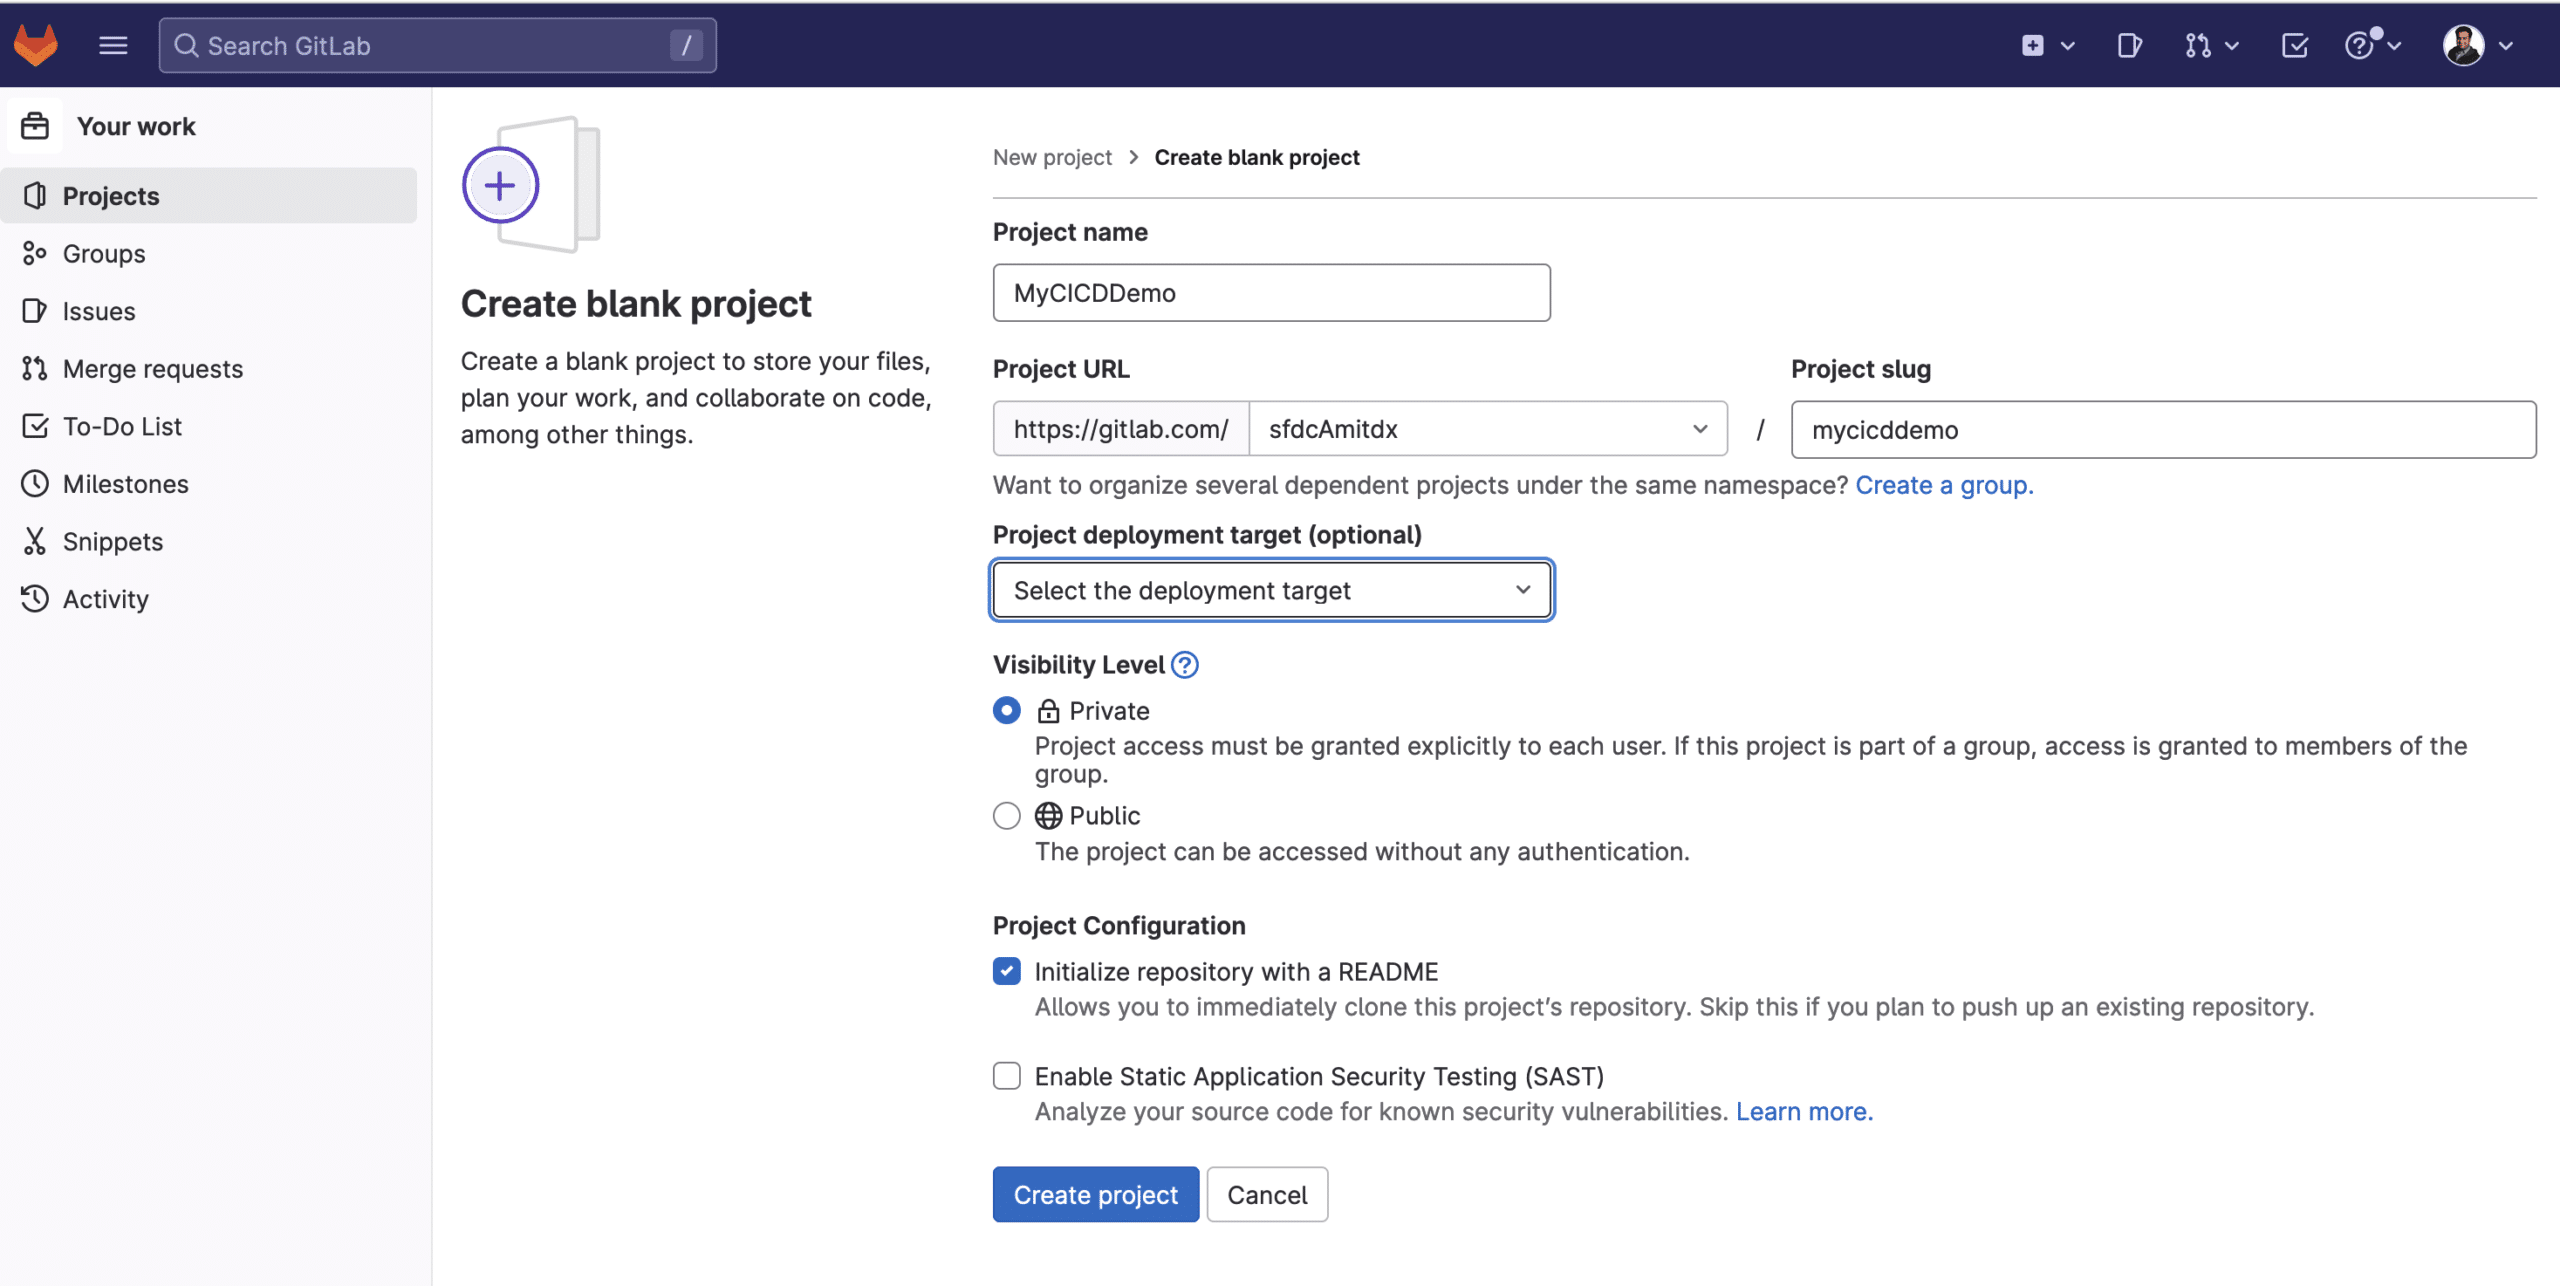
3. Create GitLab Project
Create a Gitlab project and push your Initial code into Gitlab.
3.1. Login on Gitlab.
3.2. Click on New Project.
3.3. Create a project.
3.4 Connect your Vs Code with Salesforce and pull all initial code in the local machine.
3.5. Push all your initial Code using Git commands.
4. Configure the GitLab Environment Variable
It is time to set up GitLab CI/CD variables. CI/CD variables are a type of environment variable. You can use them to Control the behavior of jobs and pipelines.
4.1. Click on Setting -> CI/CD -> Variables.
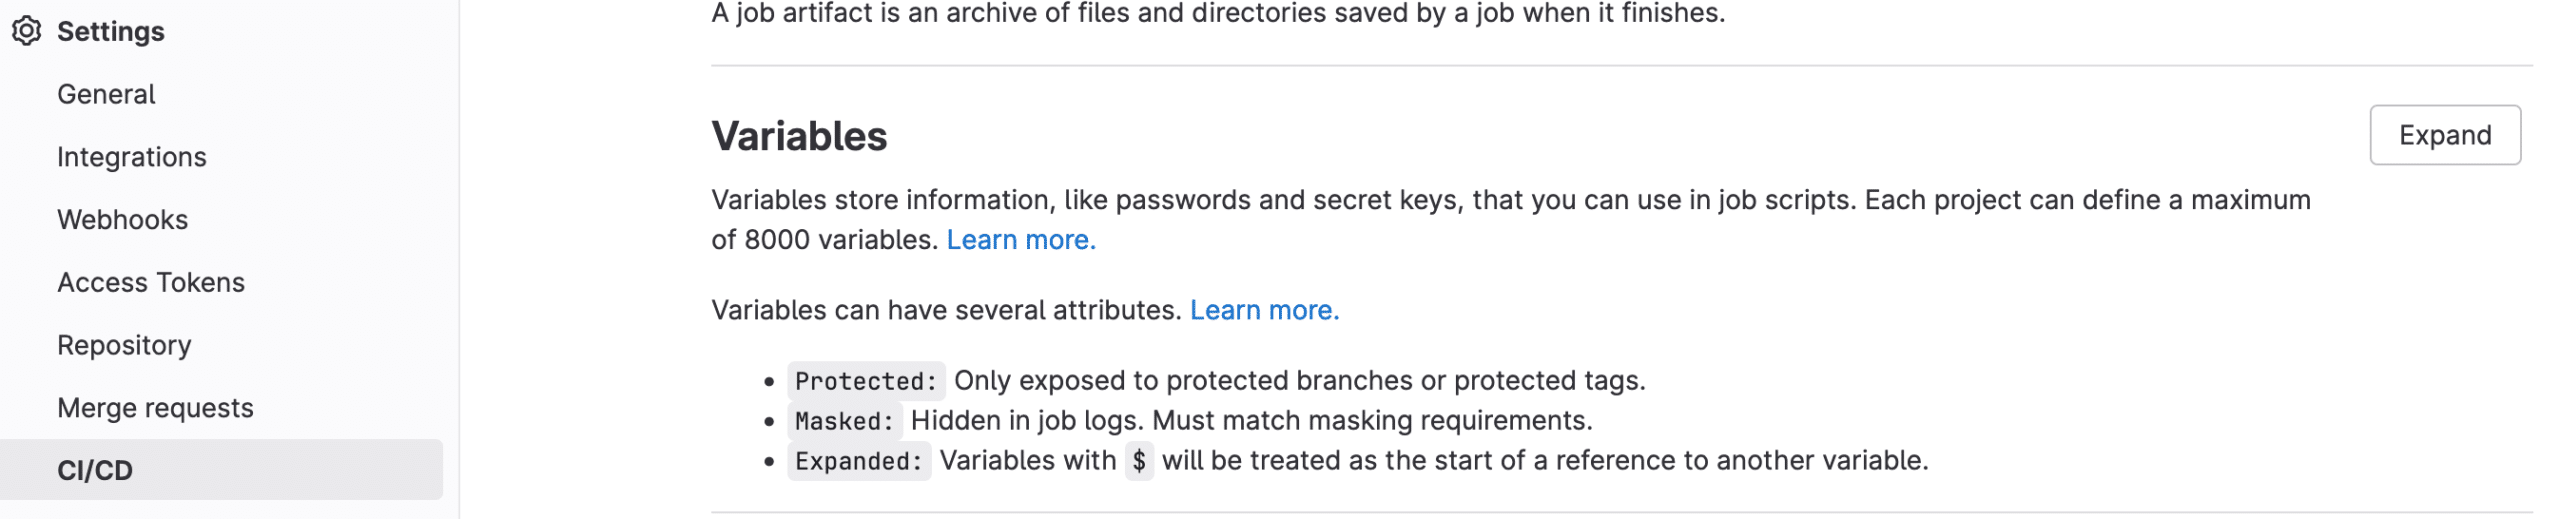
4.2. Define all variable

| Variable | Value |
| SERVER_KEY_PASSWORD | Password01 |
| SF_CONSUMER_KEY_PROD | 3MVFmexaL0bXfMzW***b9ZZkQx7dE2xfZOL1 |
| SF_USERNAME_PROD | [email protected] |
5. Configure your .gitlab-ci.yml file.
Configure your .gitlab-ci.yml file.
#
# GitLab CI/CD Pipeline : Apex Hours
#
before_script:
# Decrypt server key
- openssl aes-256-cbc -d -md md5 -in assets/server.key.enc -out assets/server.key -k $SERVER_KEY_PASSWORD
# Install jq
- apt update && apt -y install jq
# Setup SFDX environment variables
- export CLIURL=https://developer.salesforce.com/media/salesforce-cli/sfdx-linux-amd64.tar.xz
- export SFDX_AUTOUPDATE_DISABLE=false
- export SFDX_USE_GENERIC_UNIX_KEYCHAIN=true
- export SFDX_DOMAIN_RETRY=300
- export ROOTDIR=force-app/main/default/
- export SCRATCH_ORG_ALIAS="ApexHours"
# Install Salesforce CLI
- mkdir sfdx
- wget -qO- $CLIURL | tar xJ -C sfdx --strip-components 1
- "./sfdx/install"
- export PATH=./sfdx/$(pwd):$PATH
# Output CLI version and plug-in information
- sfdx --version
- sfdx plugins --core
stages:
- build-testing
- prod-deploy
#
# Create Scratch Org for build-testing -- ApexHours
#
build-testing:
stage: build-testing
script:
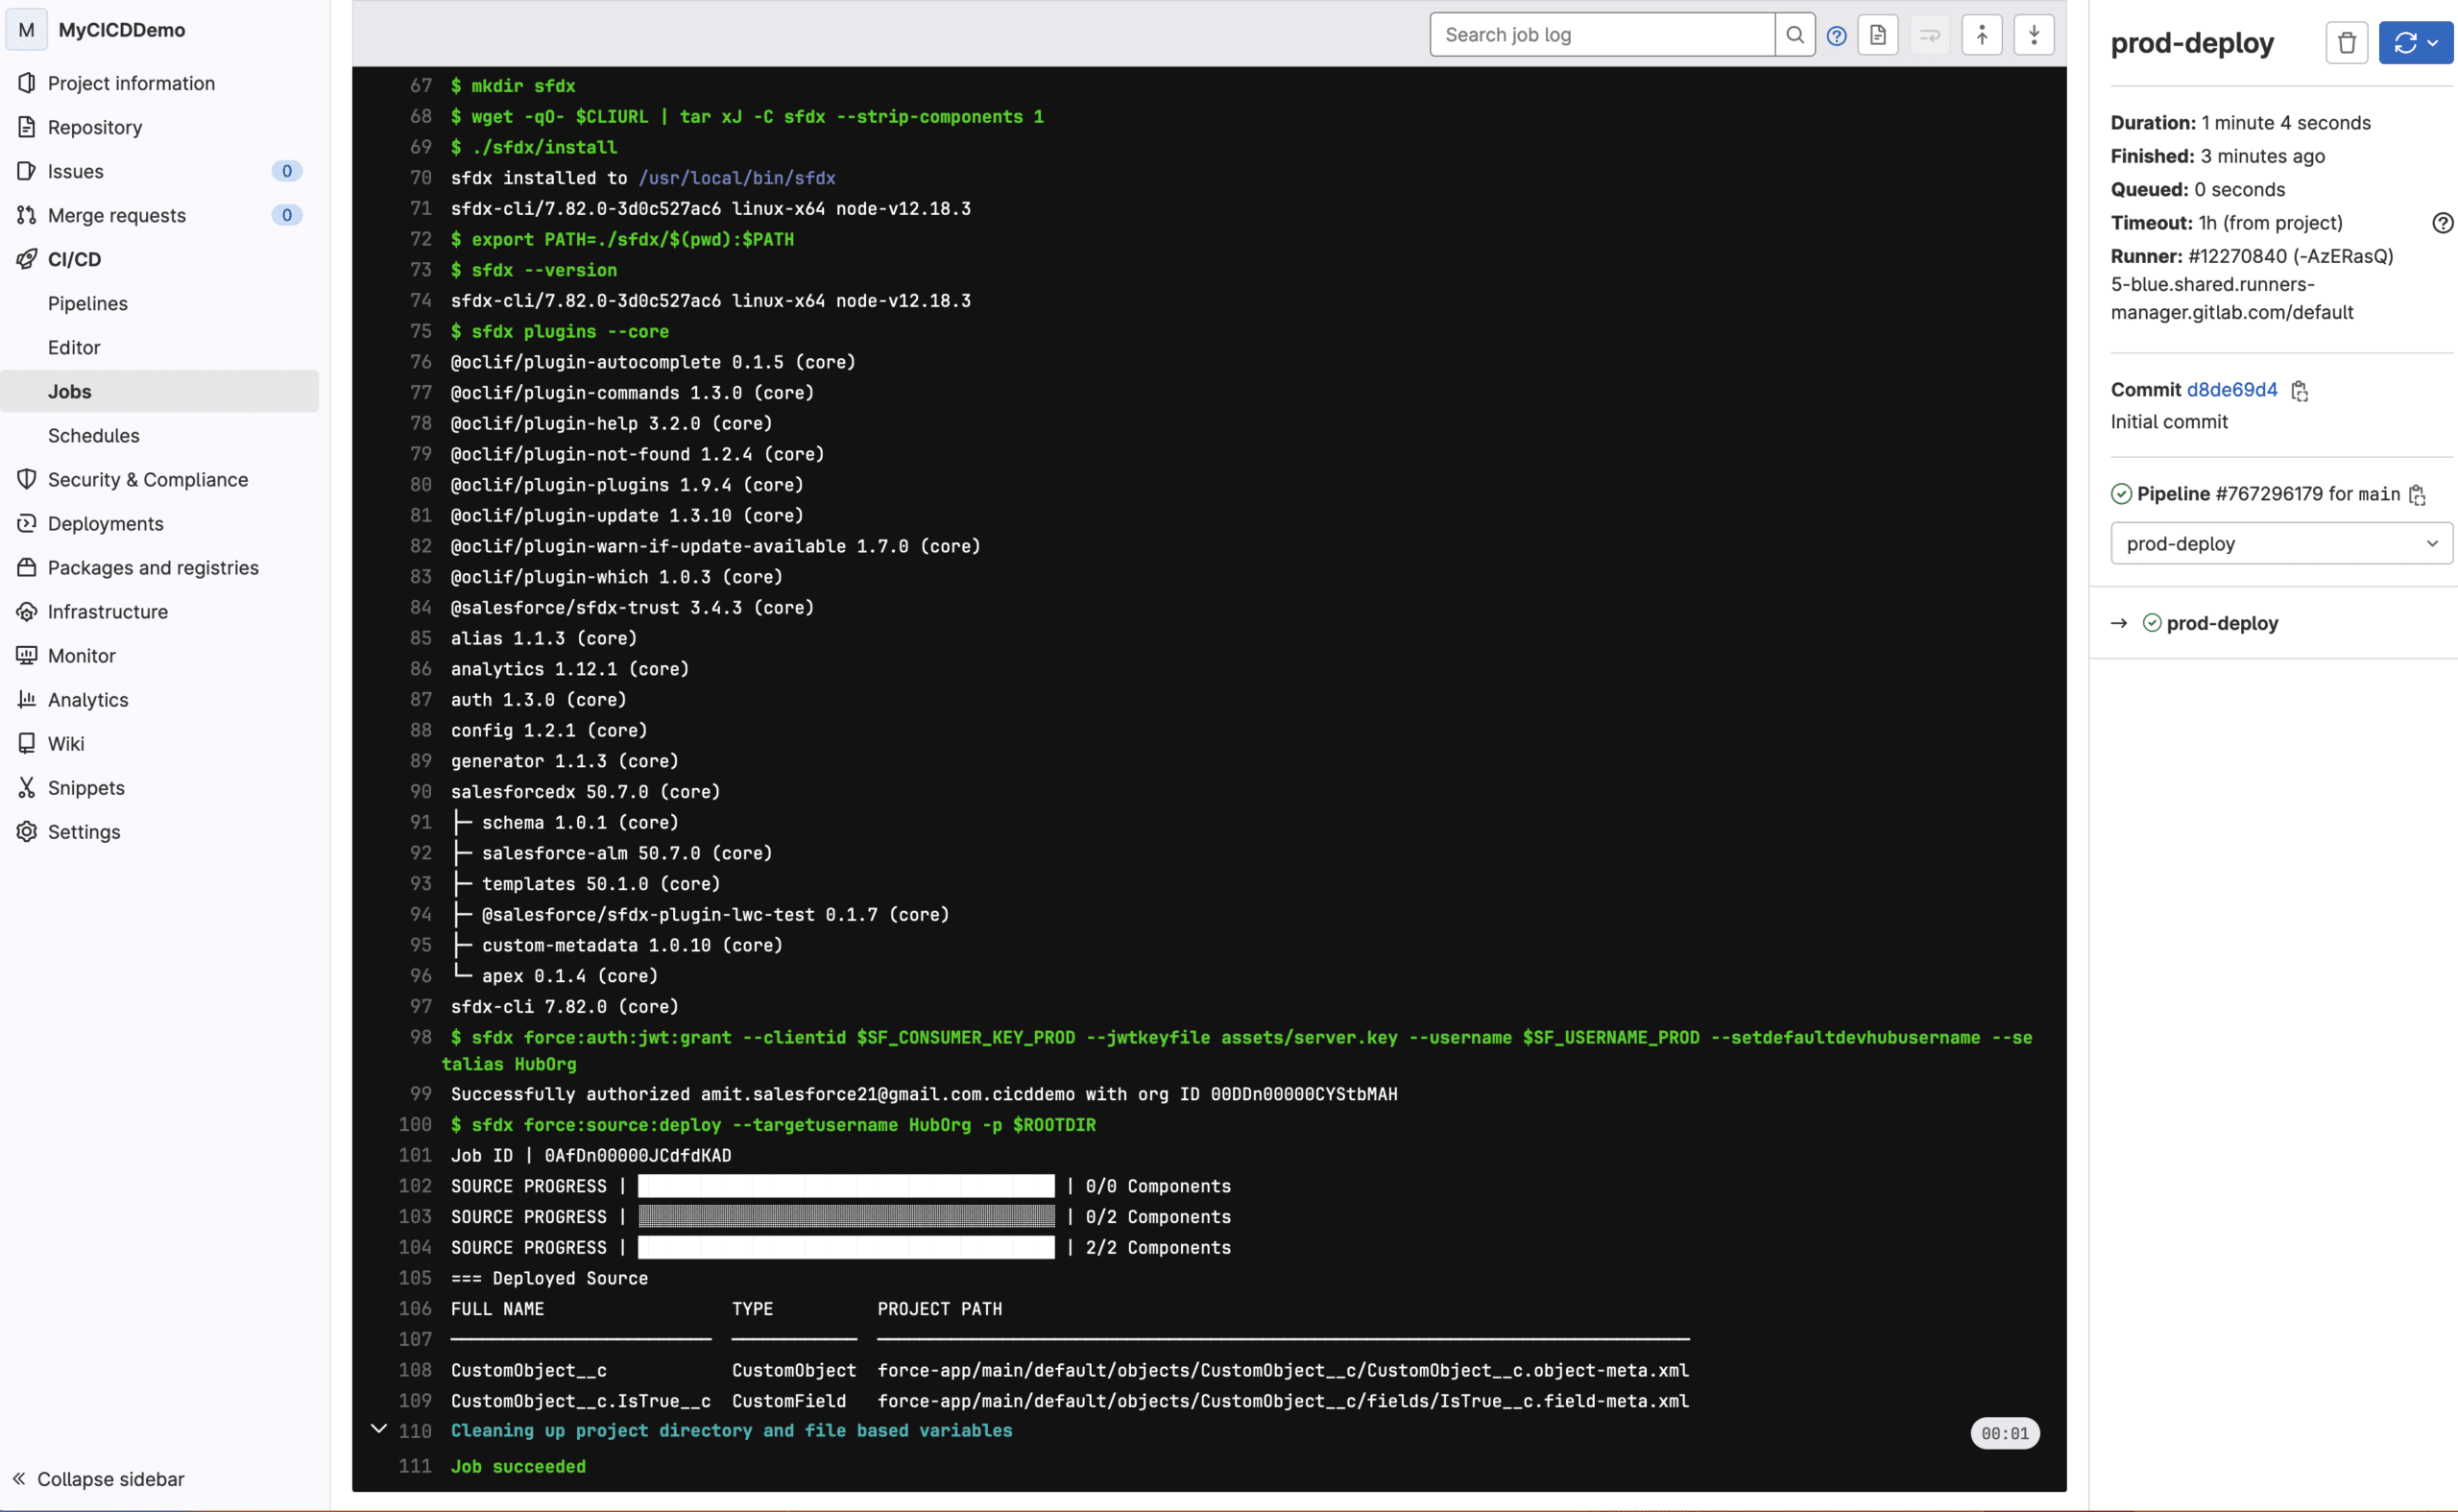
# Authenticate to the Dev Hub using the server key
- sfdx force:auth:jwt:grant --clientid $SF_CONSUMER_KEY_PROD --jwtkeyfile assets/server.key --username $SF_USERNAME_PROD --setdefaultdevhubusername --setalias HubOrg
# Create scratch org
- sfdx force:org:create --targetdevhubusername HubOrg --setdefaultusername --definitionfile config/project-scratch-def.json --setalias $SCRATCH_ORG_ALIAS --wait 10 --durationdays 7
- sfdx force:org:display --targetusername $SCRATCH_ORG_ALIAS
# Push source to scratch org (This is with source code, all files, etc)
- sfdx force:source:push --targetusername $SCRATCH_ORG_ALIAS
# Delete Scratch Org
- sfdx force:org:delete --targetusername $SCRATCH_ORG_ALIAS --noprompt
prod-deploy:
stage: prod-deploy
when: manual
script:
# Authenticate to the Dev Hub using the server key
- sfdx force:auth:jwt:grant --clientid $SF_CONSUMER_KEY_PROD --jwtkeyfile assets/server.key --username $SF_USERNAME_PROD --setdefaultdevhubusername --setalias HubOrg
# Push source to scratch org (This is with source code, all files, etc)
- sfdx force:source:deploy --targetusername HubOrg -p $ROOTDIRYou can enhance this script to run the build testing on merge requests and Trigger production deployment only main branch merge or base on your branching.
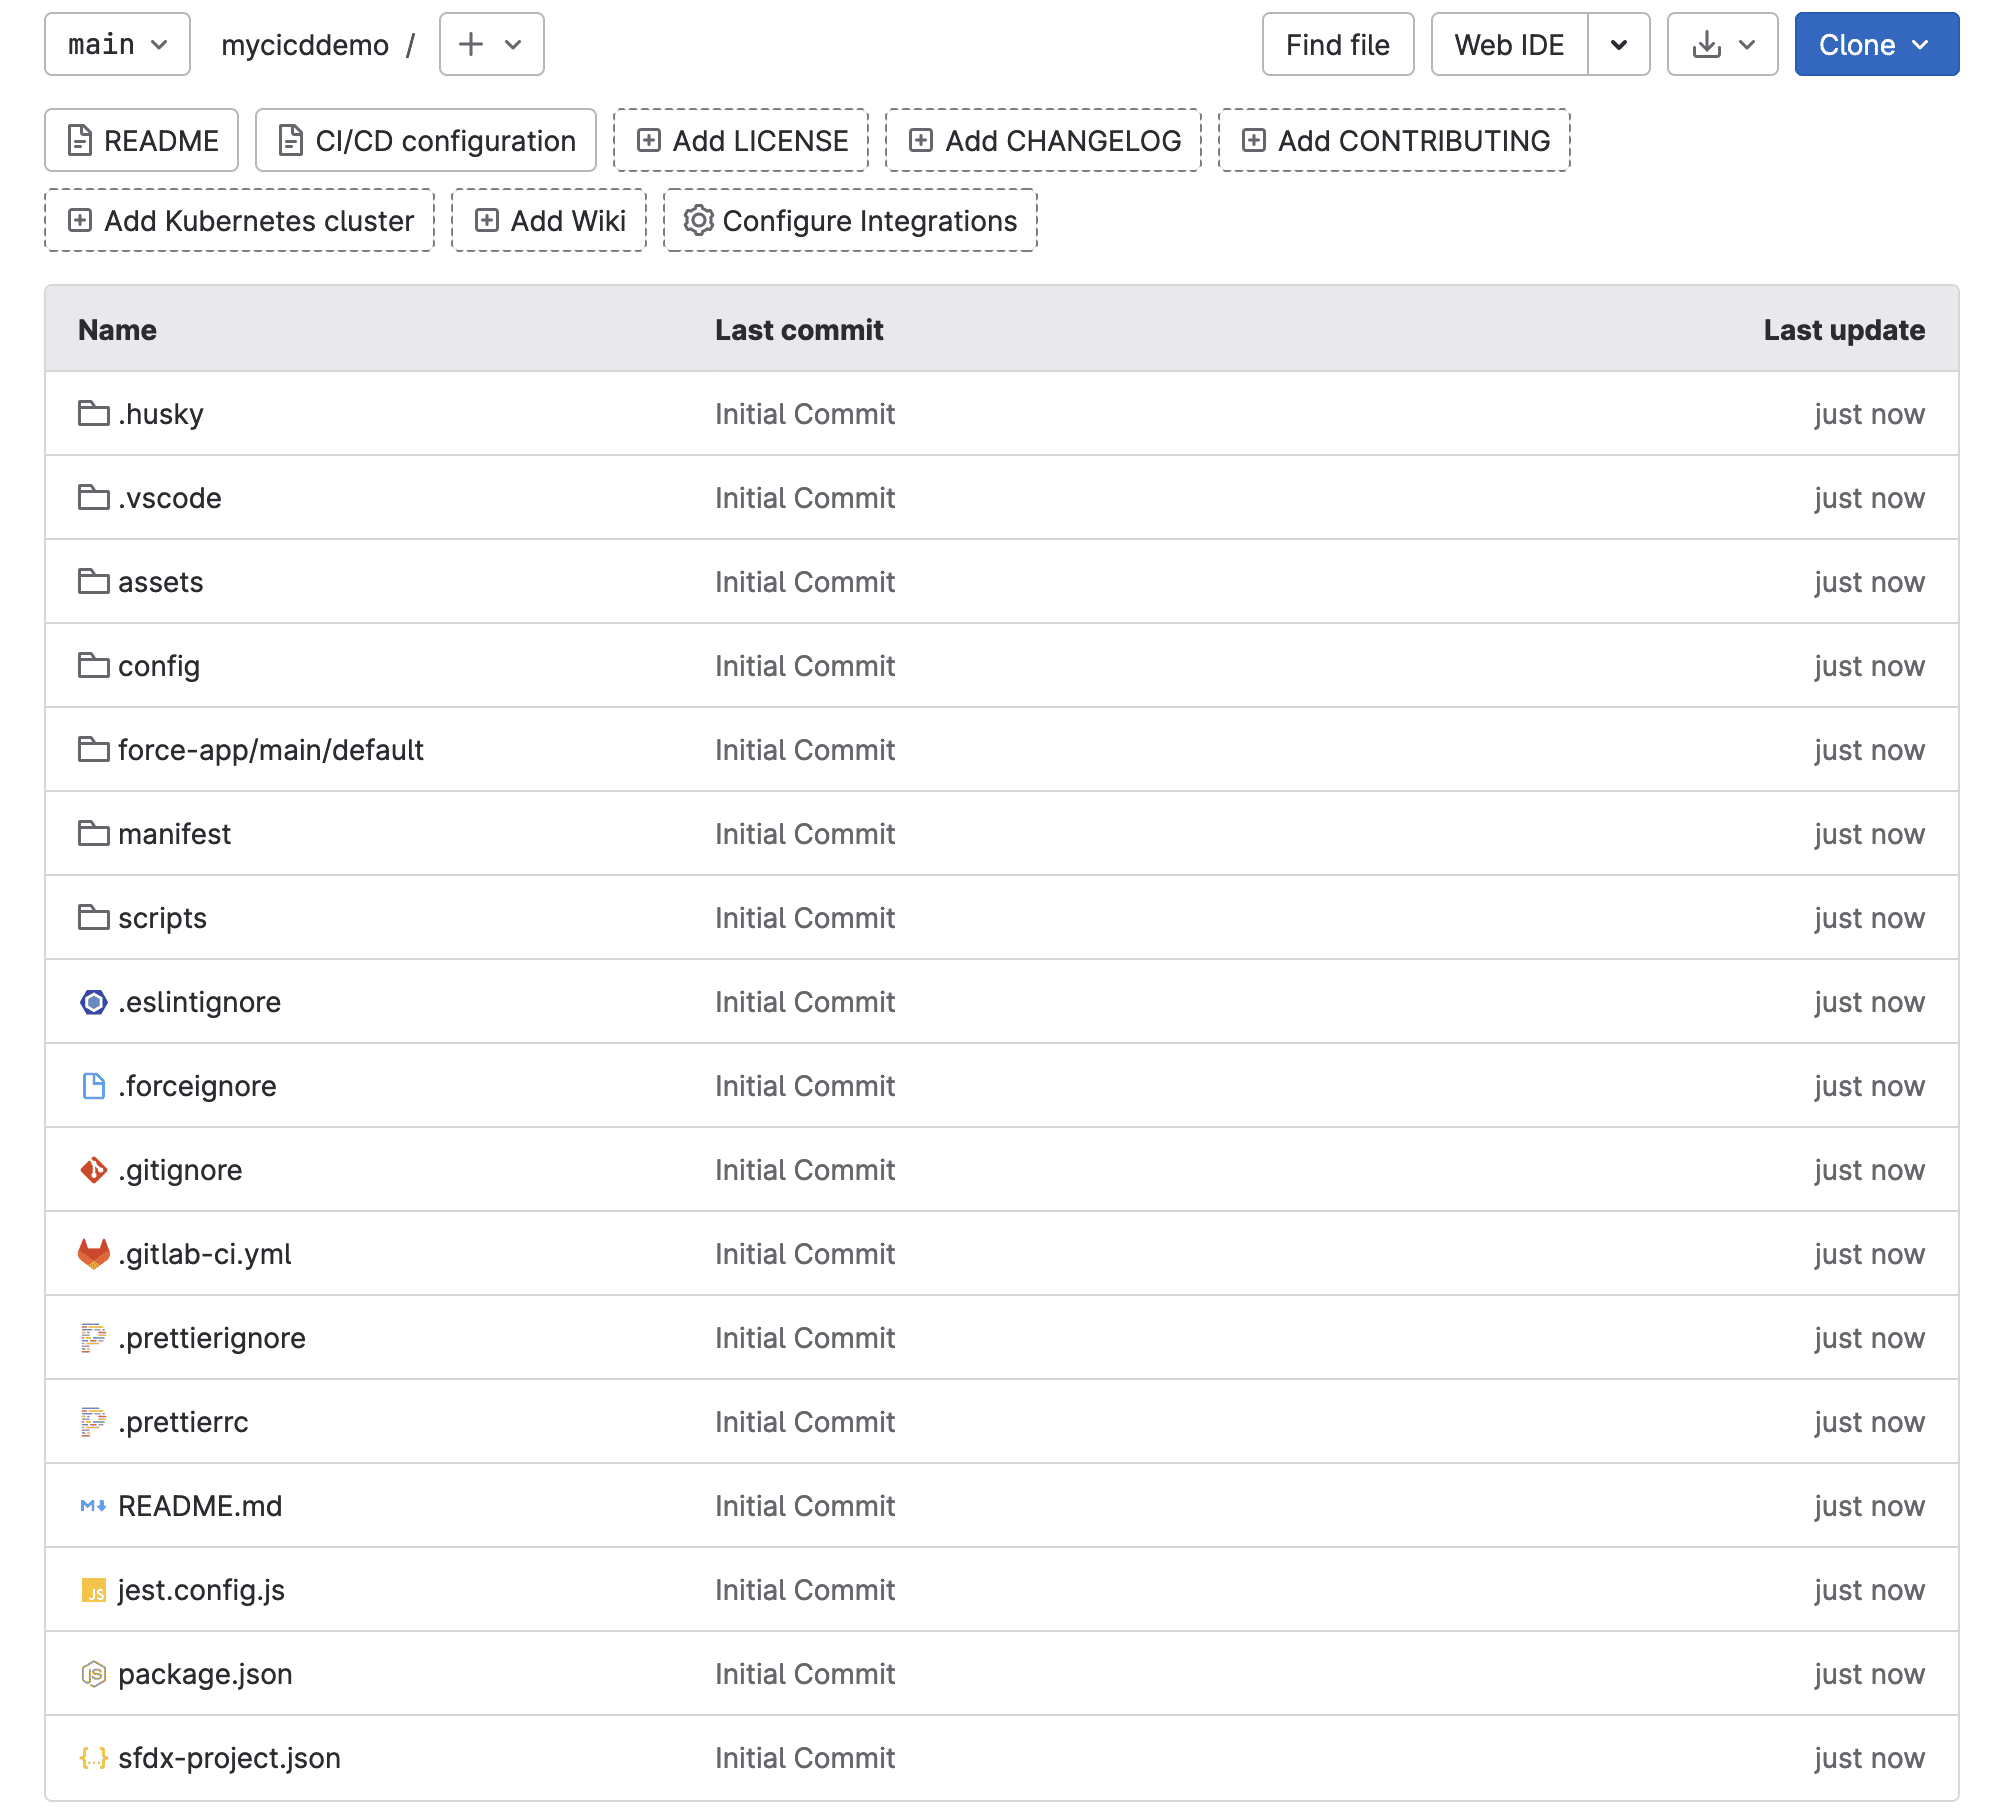
6. Commit the Initial Salesforce Project on GitLab
Then commit your asset and .gitlab-ci.yml file.
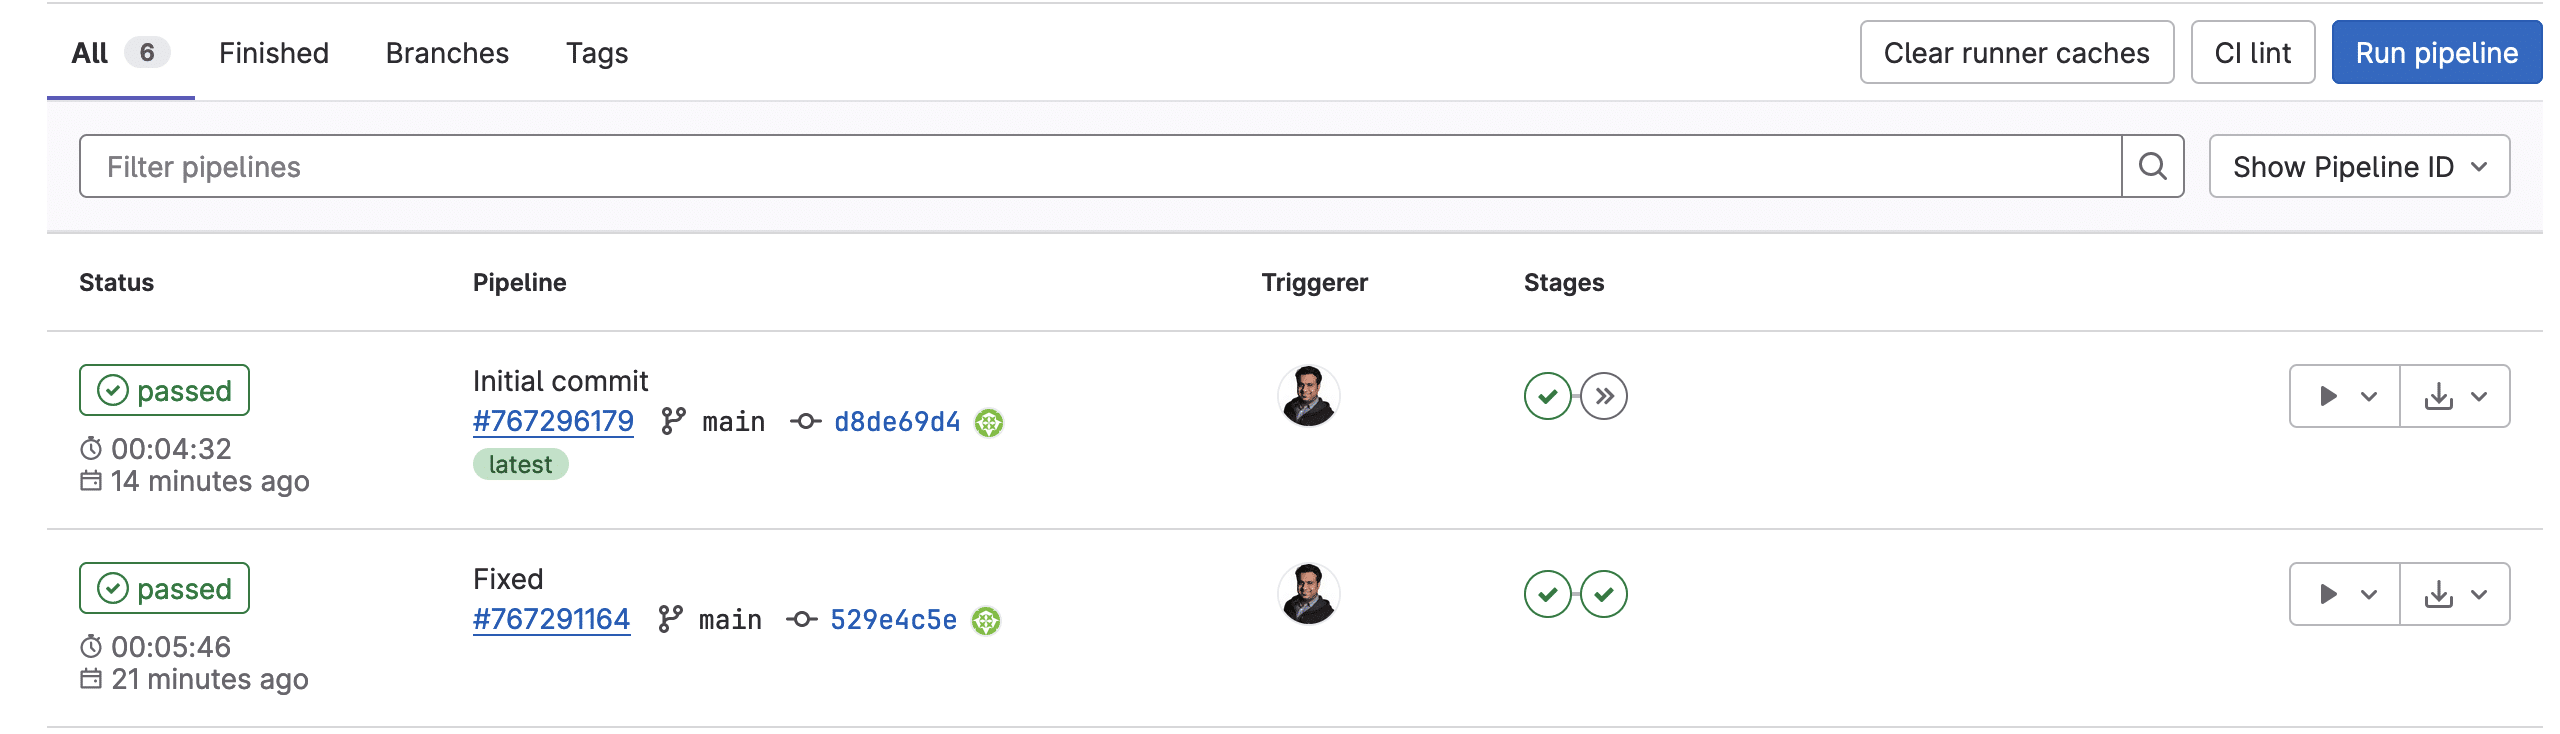
Congratulation Now your CI/CD pipeline is ready. Now to test it? Now developer needs to commit the changes in GitLab to trigger the pipeline in GitLab. Learn about Useful Git commands.
Setup your System for GitLab (For Developer one time activity)
#1. Install the CLI
Install the CLI using one of the links below
| Operating System | Link to Installer |
| macOS | https://sfdc.co/sfdx_cli_osx |
| Windows 64-bit | https://sfdc.co/sfdx_cli_win |
Make sure the CLI is properly installed and you know how to access the online help for the commands. On the command line, enter sfdx.
#2. Get Git Command Line
Go here to get the Git command line tool. Follow the installation code for your particular operating system. If you already have the Git command line tool, feel free to skip the download.
URL: https://git-scm.com/book/en/v2/Getting-Started-Installing-Git
#3. Setup SSH Key
Follow this document and setup your SSH key.
- Open a terminal
- Generate a new ED25519 SSH key pair
ssh-keygen -t ed25519 -C "[email protected]"- Next, you will be prompted to input a file path to save your SSH key pair to. If you don’t already have an SSH key pair and aren’t generating a deploy key, use the suggested path by pressing Enter. Using the suggested path will normally allow your SSH client to automatically use the SSH key pair with no additional configuration. If you already have an SSH key pair with the suggested file path, you will need to input a new file path and declare what host this SSH key pair will be used for in your ~/.ssh/config file.
- Once the path is decided, you will be prompted to input a password to secure your new SSH key pair. It’s a best practice to use a password, but it’s not required and you can skip creating it by pressing Enter twice.
- Copy your public SSH key to the clipboard by using one of the commands below depending on your Operating System:
pbcopy < ~/.ssh/id_ed25519.pub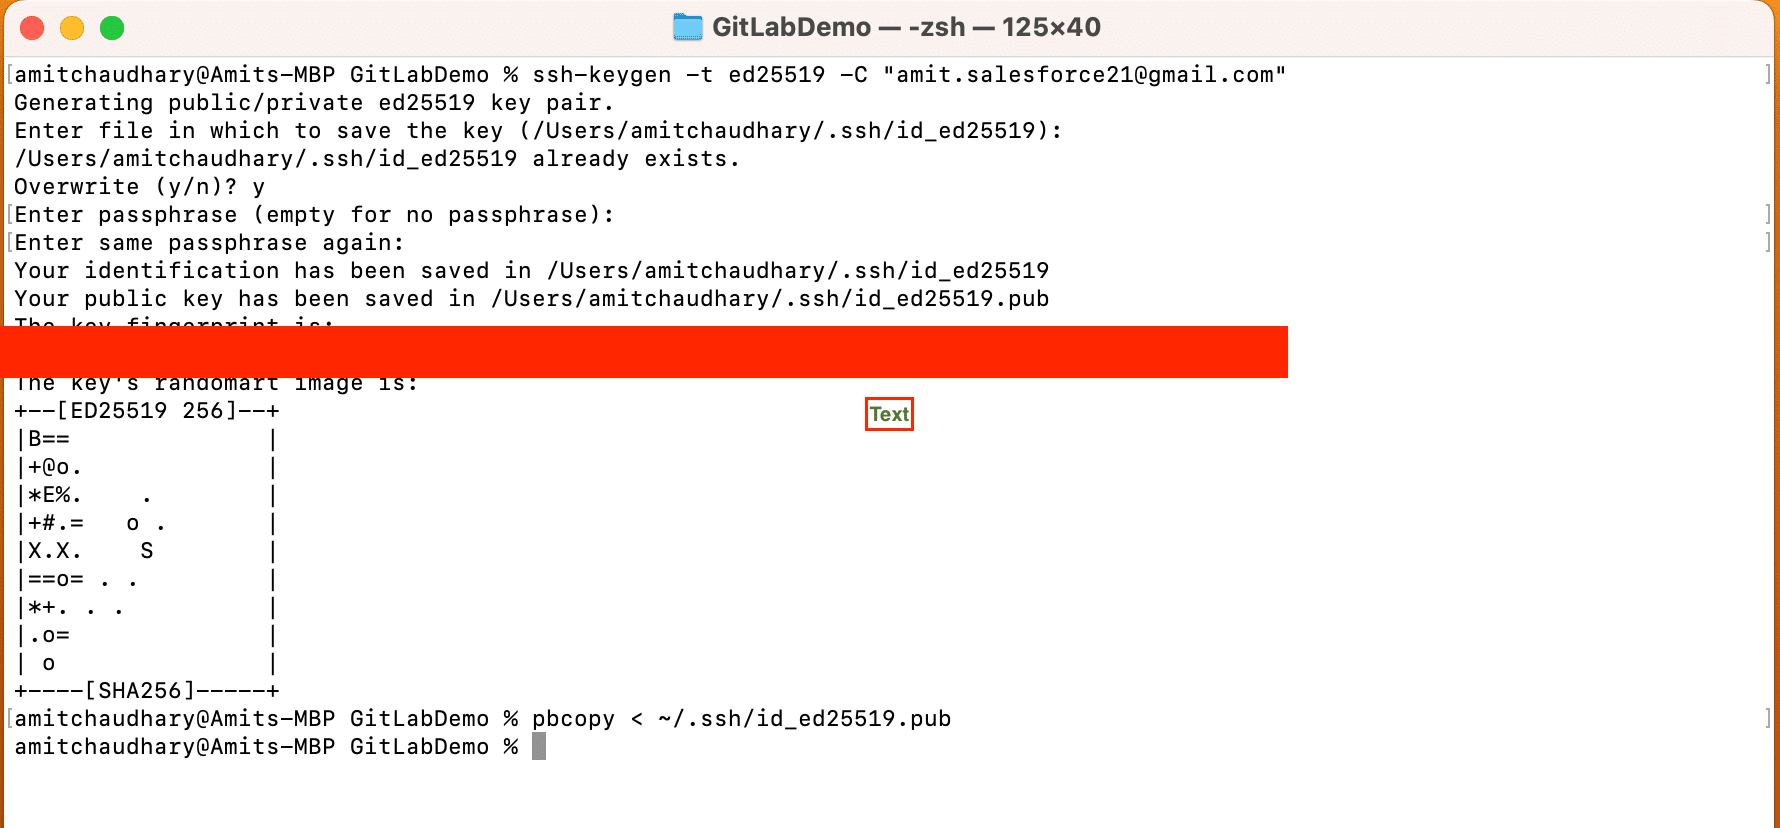
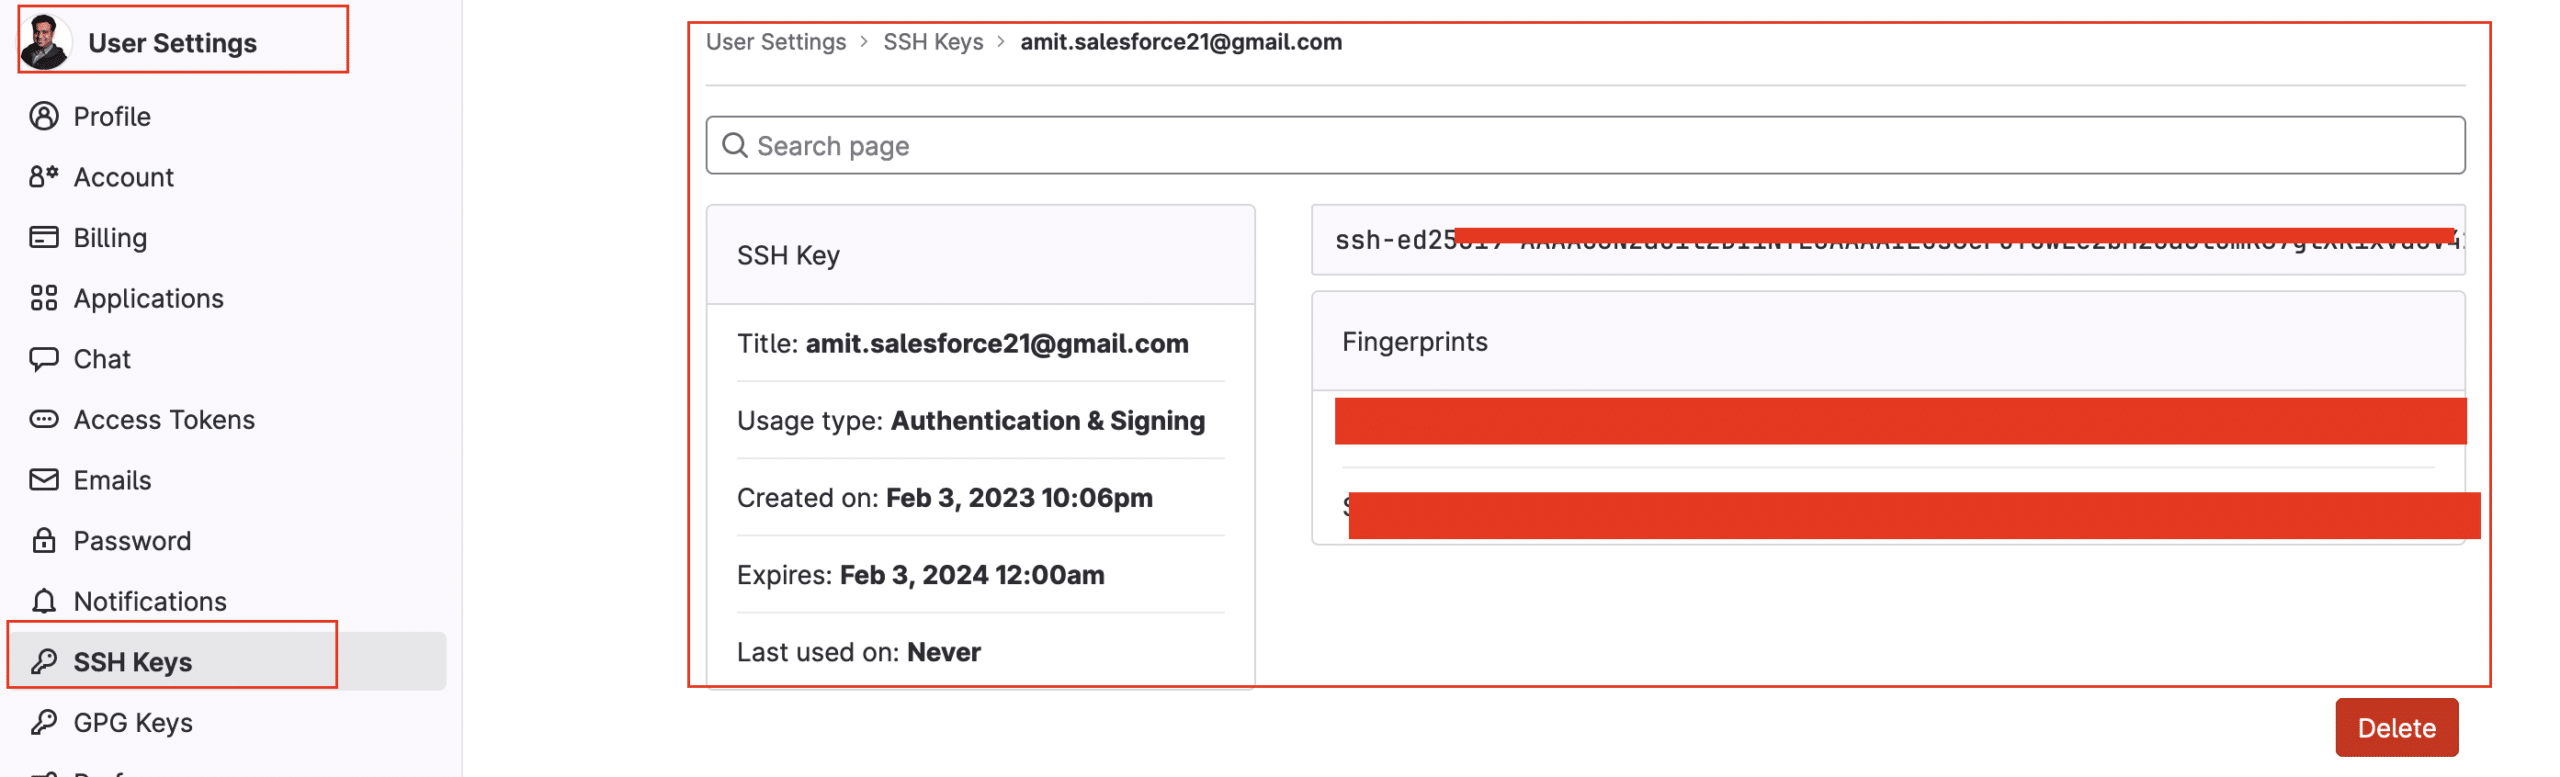
#4. Add a public SSH key to your GitLab account by:
- Clicking your avatar in the upper right corner and selecting Settings.
- Navigating to SSH Keys and pasting your public key in the Key field. If you:
- Created the key with a comment, this will appear in the Title field.
- Created the key without a comment, give your key an identifiable title like Work Laptop or Home Workstation.
- Click the Add key button.
#5. Clone GitLab Project.
Now your system is ready and lets start working on Git.
- At the top of your new GitLab project, click the Clone button to access the URL you use when pulling code for local development. Copy the line under Clone with HTTPS using the Copy to clipboard button.
- Clone your newly created project to your laptop or desktop
Navigate to Document folder or where you want to save your project and create one folder.
Then execute git clone command
Git clone Repo#6. Setup VsCode
Learn more about Setup your vs code for Salesforce and connecting Salesforce org with VsCode.
Development and Commit
#1. Development and Commit
Now it’s time to start development in your team branch.
1.1. Checkout to Team Branch
Step 1) pull all latest changes from remote
Git pullStep 2) Then checkout to your team branch with below command
Git checkout ATeam1.2. Checkout to Team Branch
Now it time to start development in VSCode.
1. Open Vs code

2. Authorize in your developer sandbox.
3. Check branch and sandbox
Make sure your checkout to your Branch and Sandbox at bottom of your VsCode screen.

#2. Commit Your Changes
Once you are done with your changes it times to commit your changes.
1. To check your changes you can use “Git Status” command
2. Commit your changes
Git add .

Git commit –m “your Message”
3. Push your changes
Git pushRaise Merge Request.
Congratulation!!! You successful pushed your changes to remote repo. Once your push your changes to remote GITLAB will trigger pipelines.
Now it’s time to raise a merge request. From your repository click on the “Create Merge Request” button.
The reviewer can merge the request and can start the Production deployment after code review.

Further Learning
Check out below post to learn more about Salesforce DevOps
Summary
There are multiple options available for For Salesforce Deployment. Check the Development and Deployment Process post to learn about Salesforce Branching Strategy and deployment standards.


Does DevOps Center from Salesforce essentially the same thing? Can you do an article that shows the same process, but using Salesforce DevOps Center? For example, I think one of the really powerful things this above explained processes allows for is the very powerful Force|Source|Pull command that allows you to download the metadata into VS Code and search it.
Pretty please, the same process with DevOps Center would be massive.
I will plan next post Salesforce DevOps center soon.
Hi,
I am very happy by your aricle, but I got a issue at the last.
When run the pipeline it’s get an error. Please if you can help me
$ sfdx force:auth:jwt:grant –clientid $SF_CONSUMER_KEY_PROD –jwtkeyfile $JWTKEYFILE –username $SF_USERNAME_PROD –setdefaultdevhubusername –setalias HubOrg
ERROR running force:auth:jwt:grant: Unexpected argument: assets/server.key
See more help with –help
Cleaning up project directory and file based variables
00:01
ERROR: Job failed: exit code 1
Make sure you added Server.Key file in assets folder
Hi Amit
Thanks for detailed article, I followed it step by step However When it run the pipeline I got the below error :
$ openssl aes-256-cbc -d -md md5 -in assets/server.key.enc -out assets/server.key -k $SERVER_KEY_PASSWORD
/scripts-45963014-4529035529/step_script: line 216: openssl: command not found
Cleaning up project directory and file based variables
00:00
ERROR: Job failed: command terminated with exit code 1
Please if you can help me
Look line you did not uploaded the certificate enc file in asset folder
Thanks Amit. I have installed openssl on the Server to fix it. After that when I decrypt the server.key.enc file it is failing because of version mismatch of Openssl. Can you help me here
Error msg from pipeline:
Processing triggers for libc-bin (2.23-0ubuntu11.2) …
$ echo “Installed”
Installed
$ openssl version
OpenSSL 1.0.2g 1 Mar 2016
$ ls
README.md
assets
force-app
$ openssl aes-256-cbc -d -md md5 -in assets/server.key.enc -out assets/server.key -k $SERVER_KEY_PASSWORD
bad decrypt
139988224575128:error:06065064:digital envelope routines:EVP_DecryptFinal_ex:bad decrypt:evp_enc.c:555:
Cleaning up project directory and file based variables
openssl aes-256-cbc -d -md sha256 -in assets/server.key.enc -out assets/server.key -k $SERVER_KEY_PASSWORD
Hi Amit, I saw alot of weblinks pointing to using Scratch orgs including this guide and (https://gitlab.com/sfdx/sfdx-cicd-template). I feel the template I linked is overkill (almost 1000 lines of code in the yaml)
I feel Scratch orgs are not so necessary for a small project/very little developers. Can you help give a sample yaml format NOT using scratch orgs at all? How would it look like? Also how to come up with the process of DestructiveChangesPre.xml and DestructiveChangesPost.xml written in yaml to handle deleting metadata (e.g. when api Name is changed, this is not an edit but creating new metadata and to remember to delete the old metadata)
Hey Amit,
I followed each step. However, when I executed the pipeline, I encountered the following error :
$ export CLIURL=https://developer.salesforce.com/media/salesforce-cli/sfdx/channels/stable/sfdx-linux-x64.tar.xz
$ export SFDX_AUTOUPDATE_DISABLE=false
$ export SFDX_USE_GENERIC_UNIX_KEYCHAIN=true
$ export SFDX_DOMAIN_RETRY=300
$ export ROOTDIR=force-app/main/default/
$ export SCRATCH_ORG_ALIAS=”ApexHours”
$ mkdir sfdx
$ wget -qO- $CLIURL | tar xJ -C sfdx –strip-components 1
$ ./sfdx/install
/usr/bin/bash: line 158: ./sfdx/install: No such file or directory
Cleaning up project directory and file based variables
00:00
ERROR: Job failed: exit code 1